


Photo by Justin Luebke on Unsplash
Getting started with Epoxy
A gentle introduction to epoxy with Kotlin


RecyclerView
if you're an android developer, you will (if not yet) at some point need to build a complex RecyclerView with different types of views. Creating such a view can become quite complicated and will require a lot of boilerplate code if you're not using a library. To avoid this complexity you can use some libraries like Groupie, FastAdapter or Epoxy. In this article, we will focus on Epoxy.
Epoxy
Before Epoxy I have been a long-time user of Groupie. Compared to Epoxy, Groupie is very simple to understand (at least for me). I decided to switch to epoxy because I'm currently working on an app with lots of RecyclerViews. In some places, we have a vertical scrolling view that contains multiple horizontal scrolling views. We have to handle the state of all those views and restore the app to the previous state after a configuration change. After a study, we noticed that Epoxy facilitates a lot the handling of those states compared to Groupie which doesn't (at the time of writing).
After a study (which I continue to do) I noticed that it was hard to find a beginner guide to Epoxy so I decided to contribute.
Skeleton app
We will build an app with the screen below
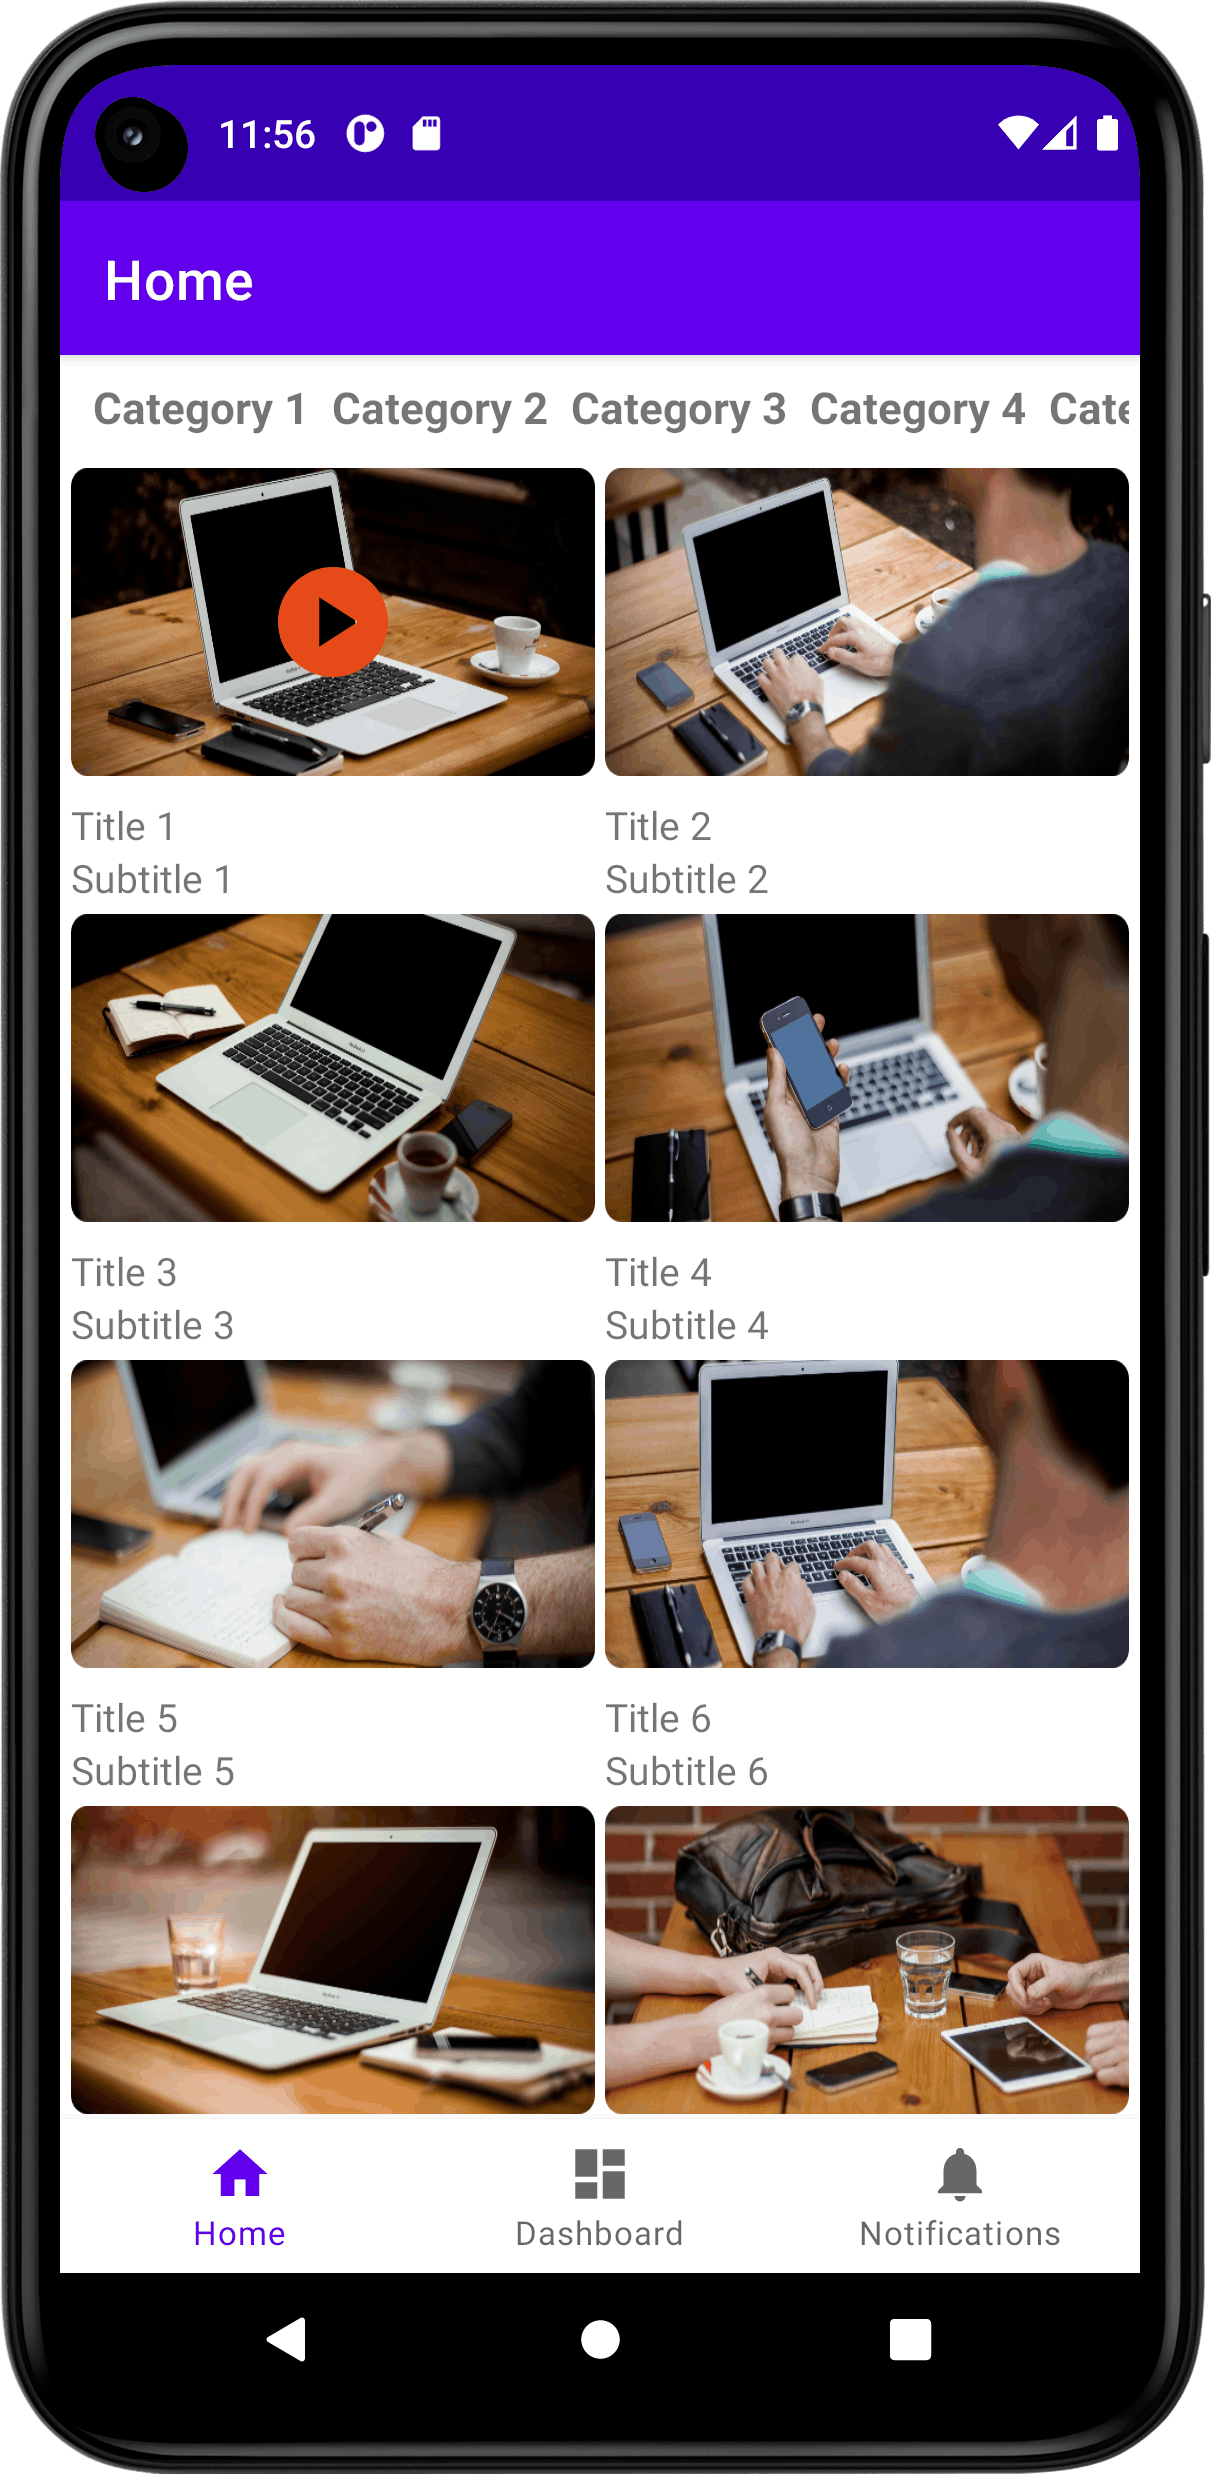
As you can see, on home screen we have a grid of images with titles to display. As a requirement, we want preload the images in the grid so when a cell is displayed the user will see the image instantly.
Configurations
In order to work with [Epoxy] you need to add these dependencies to your gradle
// Epoxy
implementation "com.airbnb.android:epoxy:5.0.0-beta05"
kapt "com.airbnb.android:epoxy-processor:5.0.0-beta05"
implementation "com.airbnb.android:epoxy-glide-preloading:5.0.0-beta05" // for glide
The last one is optional. In our case, we need it to preload images with glide.
Home Screen
Let's start by creating the views we want to display on the home screen. We have two composed views:

item_image.xml
<?xml version="1.0" encoding="utf-8"?>
<androidx.constraintlayout.widget.ConstraintLayout xmlns:android="http://schemas.android.com/apk/res/android"
    xmlns:app="http://schemas.android.com/apk/res-auto"
    xmlns:tools="http://schemas.android.com/tools"
    android:layout_width="match_parent"
    android:layout_height="wrap_content">
  <FrameLayout
      android:id="@+id/imageFrameLayout"
      android:layout_width="match_parent"
      android:layout_height="wrap_content"
      app:layout_constraintTop_toTopOf="parent"
      app:layout_constraintStart_toStartOf="parent">
    <androidx.appcompat.widget.AppCompatImageView
        android:id="@+id/mainImage"
        android:layout_width="match_parent"
        android:layout_height="112dp"
        android:scaleType="fitXY"
        tools:src="@tools:sample/avatars"
        />
    <androidx.appcompat.widget.AppCompatImageView
        android:id="@+id/selectedImage"
        android:layout_width="48dp"
        android:layout_height="48dp"
        android:layout_gravity="center"
        app:srcCompat="@drawable/ic_play_circle"
        android:tint="#E64A19"
        android:visibility="invisible"
        tools:visibility="visible"
        />
  </FrameLayout>

  <androidx.appcompat.widget.LinearLayoutCompat
      android:layout_width="match_parent"
      android:layout_height="wrap_content"
      android:layout_marginTop="8dp"
      app:layout_constraintTop_toBottomOf="@id/imageFrameLayout"
      app:layout_constraintStart_toStartOf="parent"
      app:layout_constraintEnd_toEndOf="parent"
      android:orientation="vertical">
    <androidx.appcompat.widget.AppCompatTextView
        android:id="@+id/titleTextView"
        android:layout_width="match_parent"
        android:layout_height="wrap_content"
        tools:text="Title"
      />
    <androidx.appcompat.widget.AppCompatTextView
        android:id="@+id/subtitleTextView"
        android:layout_width="match_parent"
        android:layout_height="wrap_content"
        tools:text="Subtitle"
        />
  </androidx.appcompat.widget.LinearLayoutCompat>
</androidx.constraintlayout.widget.ConstraintLayout>
- Category: Contains a TextView

item_category.xml
<?xml version="1.0" encoding="utf-8"?>
<androidx.appcompat.widget.AppCompatTextView xmlns:android="http://schemas.android.com/apk/res/android"
    xmlns:tools="http://schemas.android.com/tools"
    android:id="@+id/category_text_view"
    android:layout_width="wrap_content"
    android:layout_height="wrap_content"
    android:textSize="16sp"
    android:textStyle="bold"
    tools:text="Title"
    />
Now that we have our views layouts, we can start playing with Epoxy in order to display them. We have two types of views (image and category). Each type of view must be represented by an EpoxyModel. Epoxy has multiple way to create EpoxyModel. Here is one way:
ImageModel.kt
@EpoxyModelClass
abstract class ImageModel : EpoxyModelWithHolder<ViewHolder>() {

  @EpoxyAttribute lateinit var imageUrl: String
  @EpoxyAttribute lateinit var title: String
  @EpoxyAttribute lateinit var subtitle: String
  @EpoxyAttribute var preloading: Boolean = false
  @EpoxyAttribute var selected: Boolean = false
  @EpoxyAttribute(EpoxyAttribute.Option.DoNotHash) lateinit var onClickListener: View.OnClickListener

  override fun bind(holder: ViewHolder) {
    holder.title.text = title
    holder.subtitle.text = subtitle
    holder.glide.loadImage(imageUrl, preloading).into(holder.image)
    holder.imageFrameLayout.setOnClickListener(onClickListener)
    holder.playingImage.visibility = if (selected) View.VISIBLE else View.GONE
  }

  override fun unbind(holder: ViewHolder) {
    holder.glide.clear(holder.image)
    holder.image.setImageDrawable(null)
    holder.playingImage.visibility = View.GONE
  }

  override fun getDefaultLayout(): Int = R.layout.item_image
}

class ViewHolder(parent: ViewParent) : KotlinHolder(), Preloadable {
  val imageFrameLayout by bind<FrameLayout>(R.id.imageFrameLayout)
  val image by bind<AppCompatImageView>(R.id.mainImage)
  val playingImage by bind<AppCompatImageView>(R.id.selectedImage)
  val title by bind<AppCompatTextView>(R.id.titleTextView)
  val subtitle by bind<AppCompatTextView>(R.id.subtitleTextView)
  val glide = Glide.with((parent as View).context)
  override val viewsToPreload by lazy { listOf(image) }
}
We have created a ViewHolder. The ViewHolder is a representation of our view (layout). It holds views without data.
Each time a view is displayed on screen the RecyclerView will binds its data to the ViewHolder.
How to bind data to ViewHolder ?
We need to create a class (ImageModel in our case) that inherits from EpoxyModel. Our model is a subclass of EpoxyModelWithHolder because we use ViewHolder (this is not the only way). Then we can bind our data by overriding the bind method. If you want to release data when a view is recycled you'll do it in unbind 1.
At this point, we have our ImageModel that represents one item in the lists of items that we are trying to display (see HomeScreen image). Now we need to pass our data to the RecyclerView in order to display them. With Epoxy, you'll need to create a Controller whose responsibility is to populate your RecyclerView.
ImagesController.kt
class ImagesController(
  private val isPreloading: Boolean,
  private val onItemClickListener: OnItemClickListener,
) : TypedEpoxyController<Collection<Image>>() {
  override fun buildModels(images: Collection<Image>) {
    images.forEach { image ->
      image { // image is generated by Epoxy using your model : ImageModel
        id(image.id)
        imageUrl(image.imageUrl)
        title(image.title)
        subtitle(image.subtitle)
        selected(image.isSelected)
        onClickListener { _ ->
          this@ImagesController.onItemClickListener.onClick(image)
        }
        preloading(this@ImagesController.isPreloading)
      }
    }
  }

  fun interface OnItemClickListener {
    fun onClick(image: Image)
  }
}
The buildModels method is where you tell your Controller (ImagesController in our case) how to populate your RecyclerView. As you'll notice we are looping on our images data and creating a list of ImageModel represented by image { ... } 2. We are almost done. The last step for us is to attach your controller to your RecyclerView. For that we'll use EpoxyRecyclerView 3.
HomeFragment.kt
class HomeFragment : Fragment() {
  companion object {
    private const val ITEMS_SIZE = 800
  }

  private val controller by lazy {
    ImagesController(
      isPreloading = true,
      onItemClickListener = ItemClickCallback(),
    )
  }

  private val images = mutableListOf<Image>()

  override fun onCreate(savedInstanceState: Bundle?) {
    super.onCreate(savedInstanceState)
    repeat(ITEMS_SIZE) { index ->
      val image = Image(
        id = index,
        imageUrl = "https://picsum.photos/id/$index/2048/1024",
        title = "Title ${index + 1}",
        subtitle = "Subtitle ${index + 1}",
        isSelected = index == 0,
      )
      images.add(image)
    }
  }

  override fun onCreateView(
    inflater: LayoutInflater,
    container: ViewGroup?,
    savedInstanceState: Bundle?
  ): View {
    // your code ...
    binding.epoxyRecyclerView.setHasFixedSize(true)
    binding.epoxyRecyclerView.setController(controller)
    binding.epoxyRecyclerView.setItemSpacingDp(4)

    val layoutManager = GridLayoutManager(requireContext(), 2)
    binding.epoxyRecyclerView.layoutManager = layoutManager

    controller.setFilterDuplicates(true)
    controller.setData(images)

    binding.epoxyRecyclerView.addGlidePreloader(
      GlideApp.with(requireContext()),
      preloader = glidePreloader { requestManager, model: ImageModel_, _ ->
        requestManager.loadImage(model.imageUrl, true)
      }
    )

    // your code ...
  }

  inner class ItemClickCallback : ImagesController.OnItemClickListener {
    override fun onClick(image: Image) {
      Toast.makeText(requireContext(), image.title, Toast.LENGTH_SHORT).show()
    }
  }

  fun RequestManager.loadImage(url: String, isPreloading: Boolean): RequestBuilder<Bitmap> {

    val options = RequestOptions
      .centerInsideTransform()
      .error(R.drawable.ic_launcher_background)
      .transform(RoundedCorners(16))
      .signature(ObjectKey(url.plus(if (isPreloading) "_preloading" else "_not_preloading")))

    return asBitmap()
      .apply(options)
      .load(url)
  }
}
Explanations:
binding.epoxyRecyclerView.setController(controller)attaches ourImagesControllerto ourRecyclerView.- On the line
controller.setData(images)we pass our data to the controller that will transforms those data according to our definition ofbuildModelsmethod and populate theRecyclerView.
If you followed all the steps above, you should be able to see the HomeScreen. I hope this article will help you get started with Epoxy. All feedback is welcomed. Enjoy!
Footnotes
The
unbindmethod has a bad name see this discussion for more details. ↩The
imageview is generated byEpoxy. It's properties match yourImageModelproperties at the exception ofidthat belongs to all models. ↩You can use basic
RecyclerView. ↩